
Themify is a leading innovator of powerful WordPress themes. One of the reasons why these themes are so powerful, is because of the Themify Builder. Indeed, a drag and drop page builder that allows you to create custom layouts for posts and pages.
All Themify themes are equipped with this layout builder. Besides that, it is also possible to purchase the Themify Builder separately as a plugin. A plugin that works with any WordPress theme.
When you are following this series, you know how we are going to proceed with this review of the Themify Builder. We are going to test it with the Genesis Sample theme. This test comprises an investigation of the features, a small hands-on project, and an exploration of how the Themify Builder handles templates.
Installation and Updates
Installing the Themify Builder works the same as with most WordPress plugins. You can upload the zip file with WordPress, or unzip the archive and copy it over (S)FTP to the plugins folder.

After activation, you will see that the plugin inserted a Themify Builder panel below the WordPress Settings. This Builder panel includes three pages: Settings, Builder Layouts, Builder Layout Parts. The first page, the Settings page, serves three tabs: Settings, Image Scripts, and Custom CSS.
With the Builder Settings you have the ability to configure the plugin – including disabling it completely. The Builder Plugin supports fly-in animations, and parallax effects. You can disable these for mobile only, or for all devices.
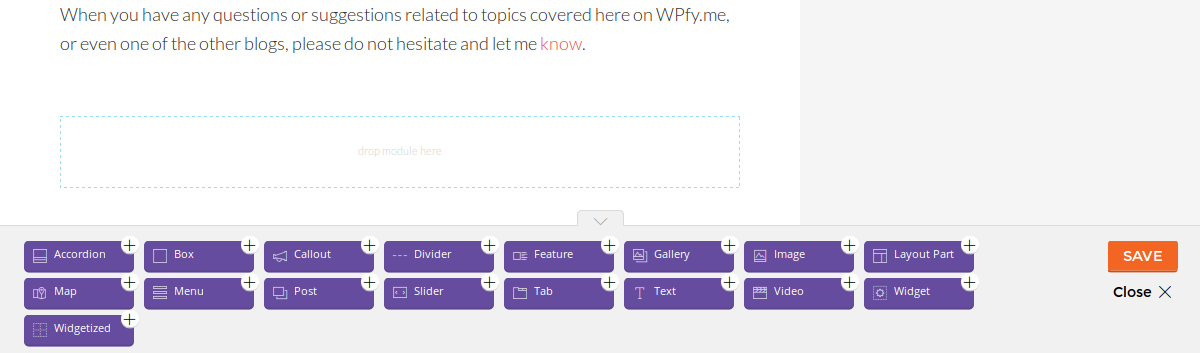
Themify Builder offers you an impressive number of modules to assemble your layouts:
|
|
Here at the Builder Settings page, you have a chance to enable/disable individual modules by clicking a check box.
Themify prefers to apply its own script for resizing images. In case you rather use the WordPress Featured Images, you can disable this functionality at the Image Script tab.
The Custom CSS tab presents just one big text area where you can enter your own CSS rules.
The Builder plugin checks for updates, every time you enter the Settings page. When there is an update available, you will see an notification with link for an automated update. Downloading the plugin from your Member Area with Themify, and re-uploading the Builder is also possible of course.
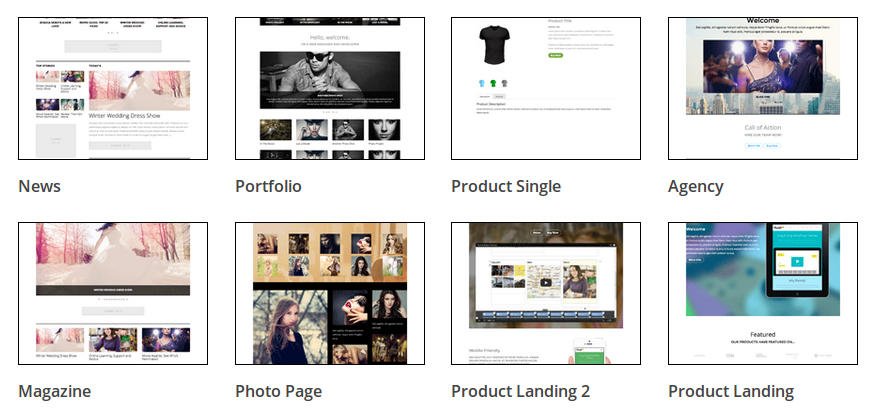
The Builder plugin activates with eight templates – pre-designed layouts: News, Portfolio, Product, Agency, Magazine, Photo, and two Landing pages.
Of course, you can also create your own layouts. The plugin offers three ways to compose a layout: from scratch, save one of your own Builder creations as a template, duplicate one of the existing (pre-designed) layouts.

The Themify Builder also allows you to create Partial Layouts. Creating a partial layout is a matter of dragging the desired modules to the canvas.
Partial layouts offer two advantages. One, you can re-use these in post and page layouts. Two, when you change a partial layouts, all layouts making use of that partial layout are updated the moment you save the partial layout. Both benefits help you to maintain uniform layouts, and speed up your design process.
Themify Layout Editors
The Themify Builder allows you to create layouts for posts and pages, and adds a “Themify Custom Panel” for this purpose below the WordPress editor.

To create your layout, simply drag the modules of your choice to the canvas below the modules panel – just as with partial layouts.
Please note that adding a Widget module allows you to select one widget, while a Widgetized Module allows you to include an entire widgetized area like a sidebar or a footer column.


The Builder canvas shows two icons in the top-left corner. Clicking the first icon, offers three choices: Options, Duplicate, and Delete.
Options, opens a dialogue window to style the row concerned. Your styling options are row width, row height, animation, background, font settings (family, size, color, etc), link, padding, margins, border, CSS class, and row anchor. The latter adds a unique ID that you can include in menus or use for in-page navigation.
The second icon at the left, allows you to divide a row in one to six columns – one is the default setting. The column options, following the image above, are:
- 1 * 1/1, 2 * 1/2, 3 * 1/3, 4 * 1/4, 5 * 1/5, 6 * 1/6
- 1/4 + 3/4, 2 * 1/4 + 1/2, 1/4 + 1/2 + 1/4, 1/2 + 2 * 1/4, 3/4 + 1/4
- 2/3 + 1/3, 1/3 + 2/3
You can also set the gutter spacing between the columns to Default, Narrow, or None.
The Themify Builder is not only available at the WordPress backend, but also from frontend.
When you are in backend mode, just click the Switch to frontend link, next to the [SAVE] button, to open the page in on the frontend.
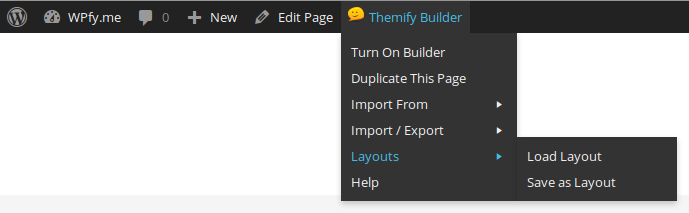
In the frontend mode, you can launch the Themify Builder from the Admin Bar.
Clicking Turn on Builder on an existing (non-Builder) web page, displays the canvas and the modules panel below the existing content – like here above with WPfy.me’s About page.
When you click the Turn on Builder link on a web page created with the Themify Builder, you get the same possibilities in frontend as you have in backend mode.
Themify Builder Project
We are going to create a static homepage with the Themify Builder, so that we get a feeling how the plugin works.
The first row on the homepage, with only one column, is intended for a welcome message – which we create with a Text module.
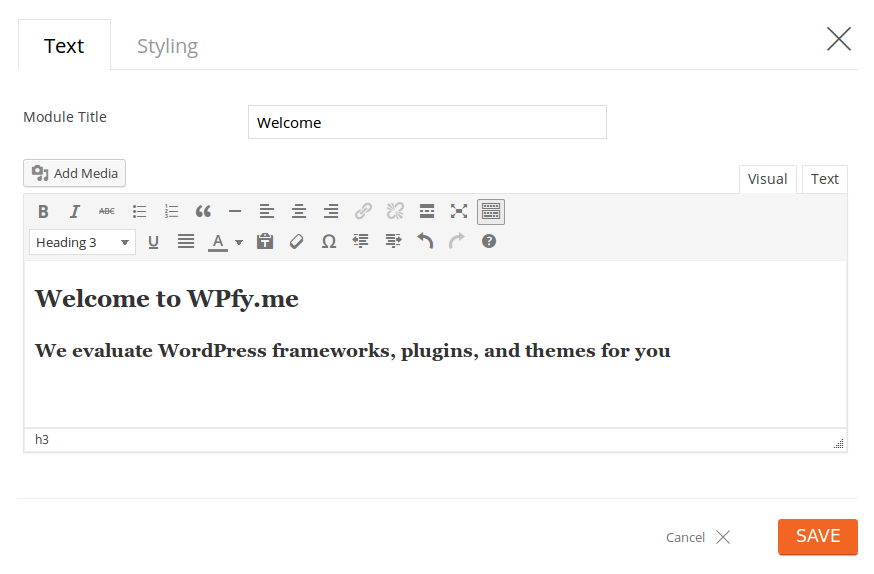
A window with the WordPress editor opens, as soon as you drop the Text module on the canvas. You can style this message with the Visual Editor or with the HTML editor. You will notice the second tab at the top – Styling. Clicking the Styling tab opens a dialogue window to style the column regarding, the column containing the Text module.
Your options are animation, background, font settings (family, size, color, etc), link, padding, margins, border, CSS class. Basically the same options as we have seen above when styling a row – except for row width, row height, and row anchor,
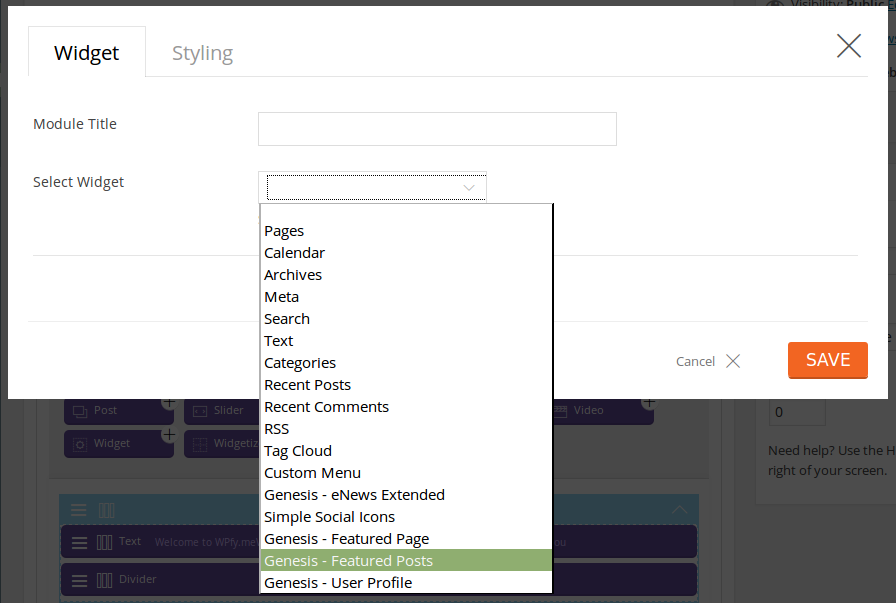
For the middle row, we need three 1/3 columns. To each column, we add an instance of the Genesis Featured Posts widget. In case of a non-Genesis theme, you might want to consider to the Flexible Posts Widget. And of course, you have the ability to style the row, as well as the columns.

The third row should consist of a 2/3 and a 1/3 column. We add a Map module to the broader column. A dialogue windows opens. To pinpoint a location, you can either enter the address or the latitude and longitude. Other options include zoom level, dimensions, and map type (Road, Satellite, Hybrid, Terrain).
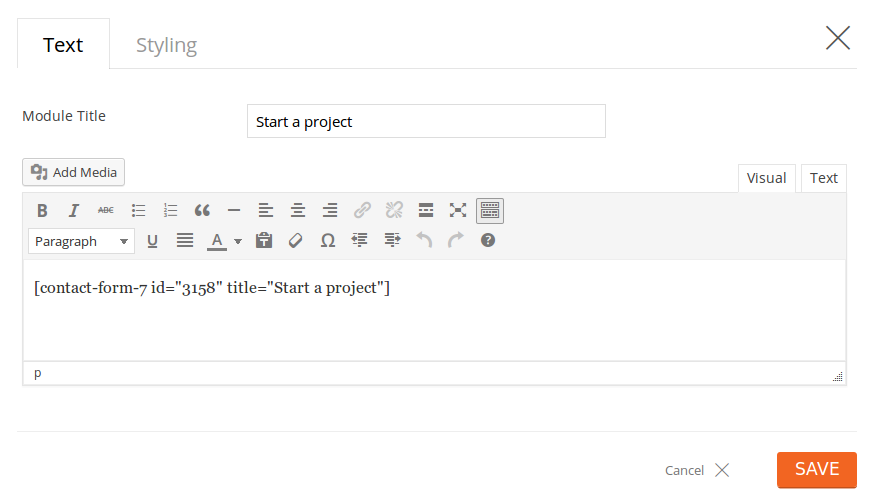
Next column. We drag a Text module to the 1/3 column, so that we can enter the shortcode of the form concerned – a form created with the Contact Form 7 plugin. In case you prefer a drag and drop form builder, have a look at WPForms Lite.
And we are done with the homepage. This is how the Themify Custom Panel looks upon completion:
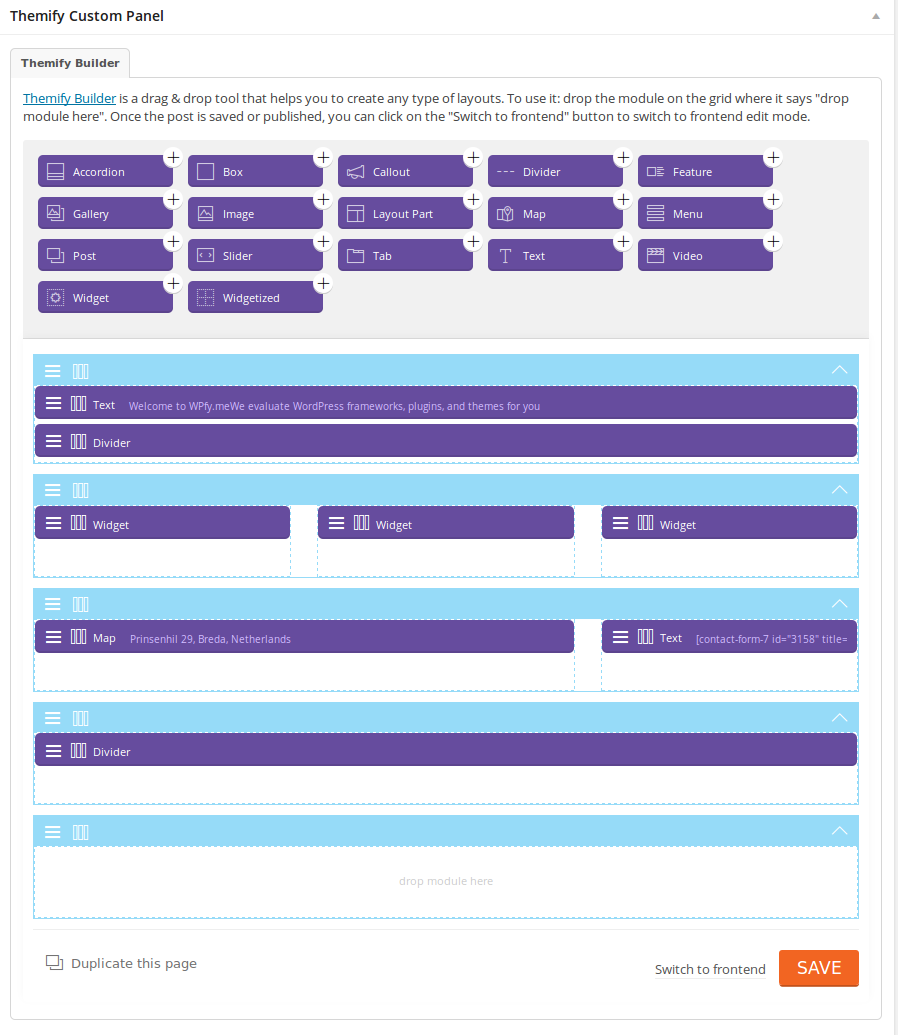
For a little pizzazz, I have included two Divider modules. One below the welcome text at the top, and a second one at the bottom. With regard to dividers you can choose from four styles (Solid, Dotted, Dashed, Double), set the thickness, color, margins, and optionally add a CSS class.
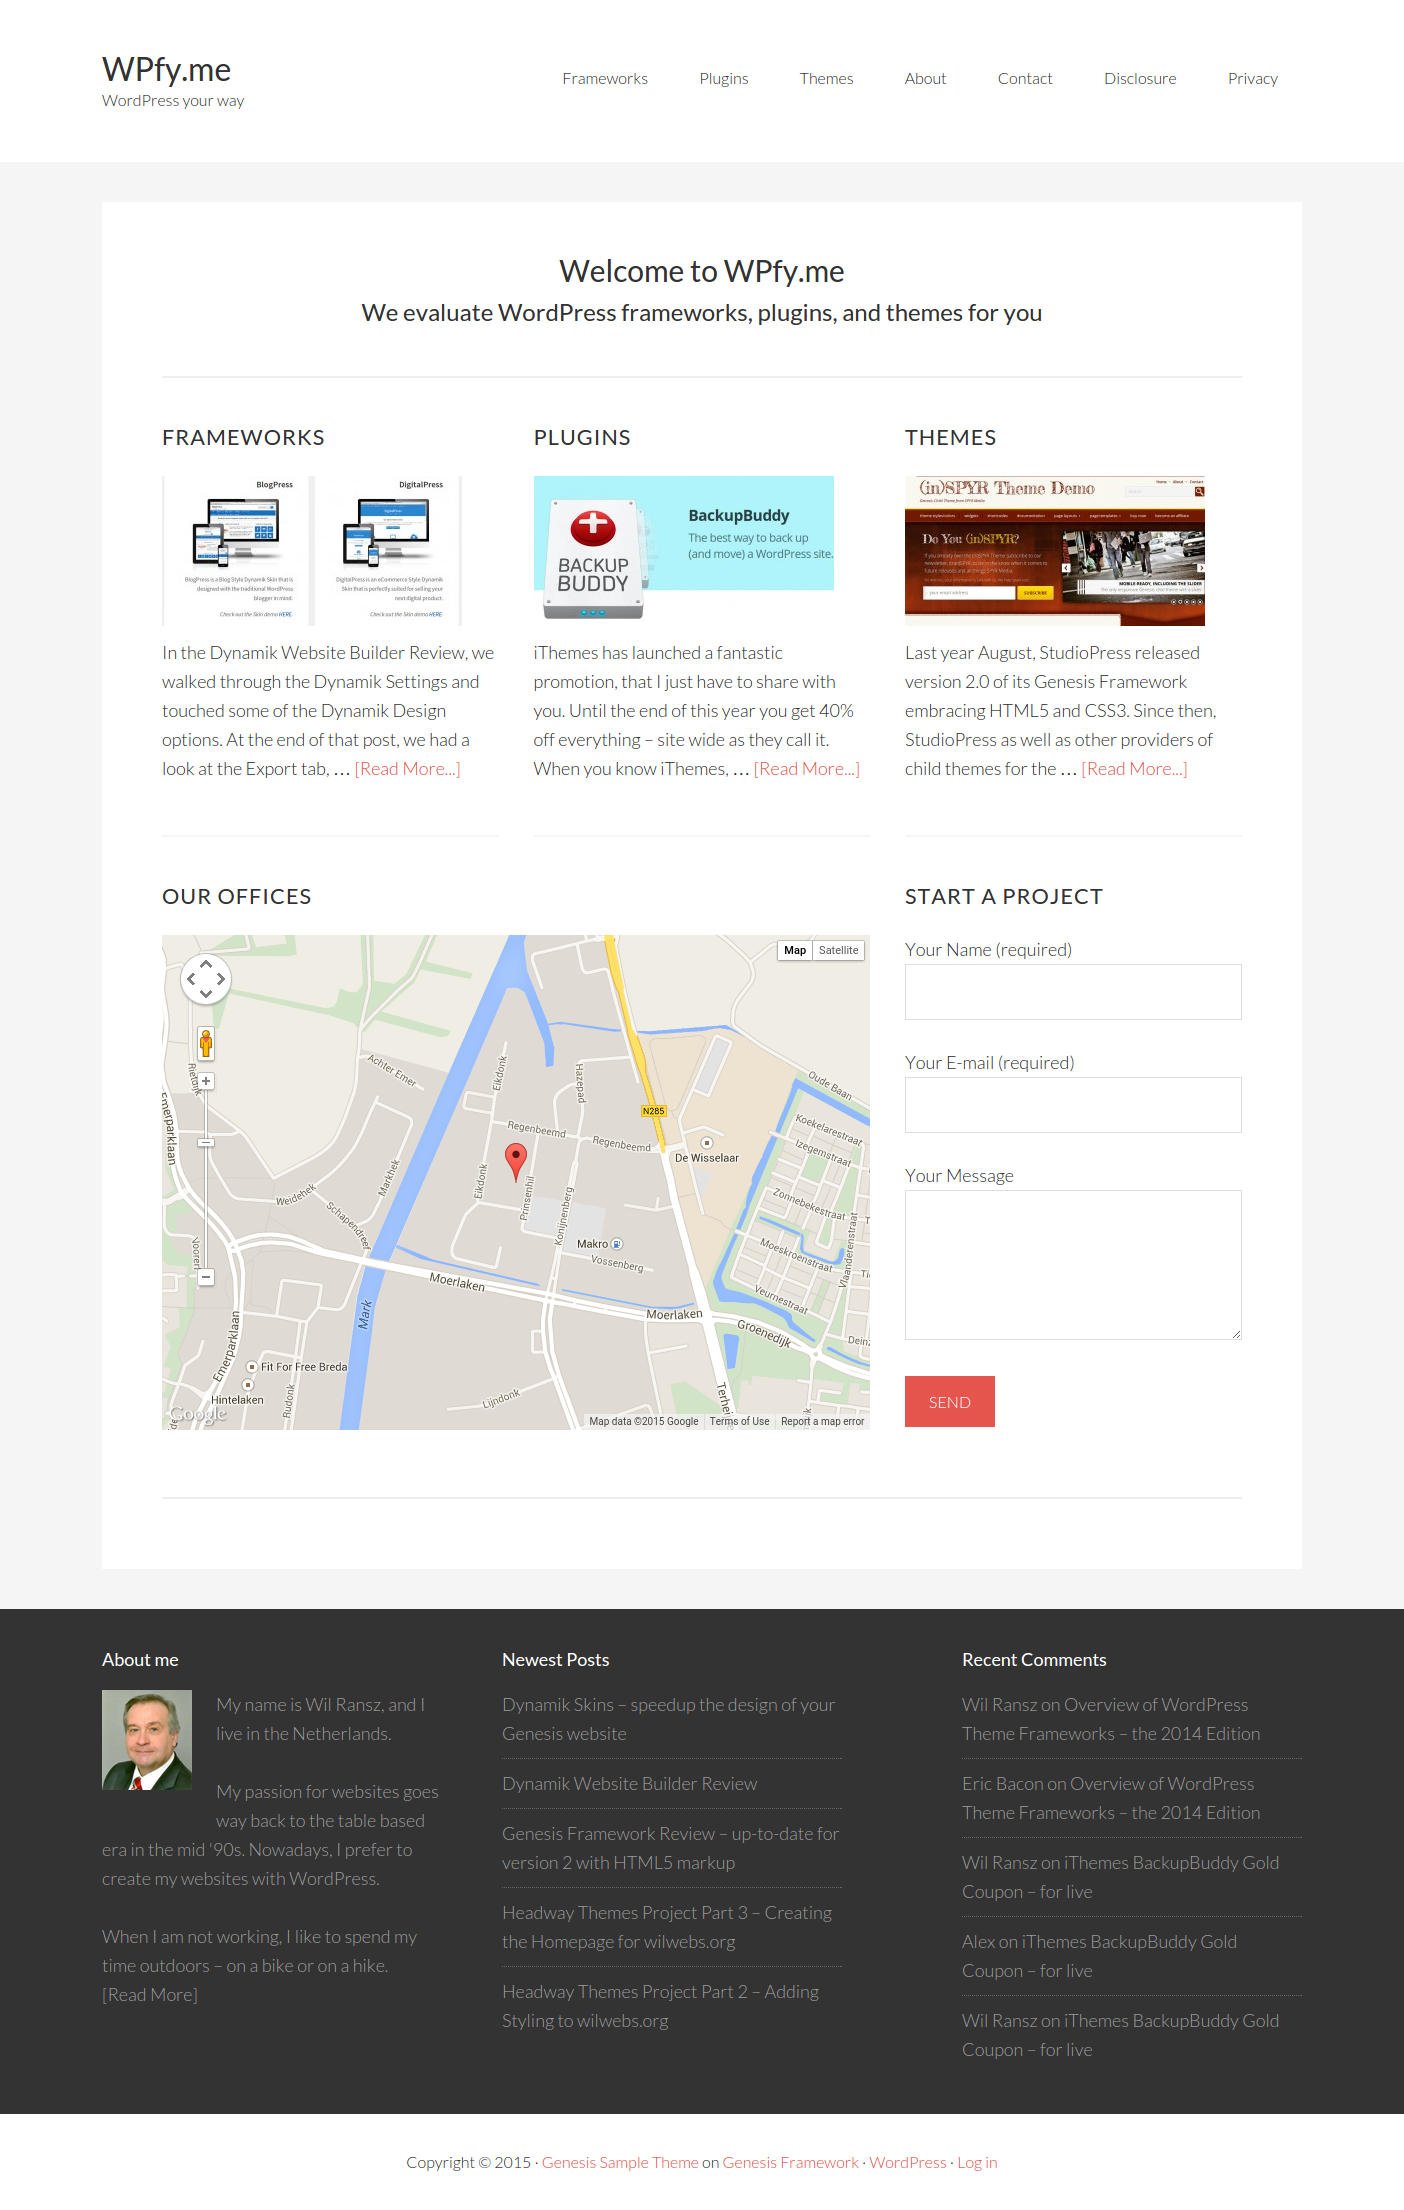
And this is how visitors perceive the page:

Opening a Builder layout in frontend mode (Turn on Builder), gives you the ability to move and edit rows and modules (columns).
When you hover over a row or column, you will notice several handlers. You can alter the number of columns, change the options of a module, duplicate a module, and delete a module. To move a module, just select it with you mouse and drag it to the new location. Easy.
Themify Builder Templates
As mentioned earlier, the Themify Builder comes with eight pre-designed layouts (templates). When you apply a pre-designed layout as it is, you only need to fill in the blanks – tweak the module options as you want them.
Here is the Themify Custom Panel of the pre-designed Magazine layout:

Another possibility is duplicating an existing template, and change it where desired.

And of course, you can also save your own creations as a template.
To save our homepage as a layout, for example:
- visit the page on the frontend
- from the Admin Bar select Themify Builder > Layouts > Save as Layout
- name the layout, and optinally upload a screenshot
- hit the [SAVE] button
Your saved layout appears among the existing Builder Layouts within the Builder panel.
Custom Post Types
Initially, the Builder plugin came with the following custom post types: Slide, Highlight, Portfolio, and Testimonial. Starting version 1.3.1 this is no longer the case. However, if you still want to use these custom post types, you can enable these with a free plugin: Builder Deprecated CPT.
Since these custom post types have been deprecated with a reason, it might be better to look for alternatives. I found that the Themify Builder collaborates with Devin Price’s Portfolio Post Type, but not with Projects by WooThemes. The Builder, however, does work with Testimonials by WooThemes.
Plans & Pricing
As we have seen, it is indeed possible to create custom layouts with the Themify Builder. Simply by drag and drop. No need to code.
The Themify Builder is available as part of the Themify Master Club, and as a separate plugin.
With the Master Club, you get access to:
- all Themify Themes, including the Photoshop layered (PSD) files
- all plugins and Builder addons
You can download all this for $139, which is not much when you consider the 46 themes.
Themify offers three Club plans, however, only the Master plan gives you access to plugins and addons.
As a separate plugin, the Themify Builder is yours for only $39.
All plans include one year of support and updates.
Questions? Remarks? Leave a comment, and I will get back to you – on weekdays usually within 24 hours.
Leave a Reply