 The Genesis Framework by StudioPress provides the perfect foundation for Genesis child themes – and websites. A Genesis child theme changes the design, and adds features to the foundation offered by the Genesis Framework.
Ready-to-run child themes are available from StudioPress, and from Genesis specialized theme shops like Appfinite. Another option is to have a Genesis developer create a custom child theme for you, or create one yourself.
Customizing an existing child theme is also possible of course. There are dozens of code snippets available from StudioPress alone. All you have to do, is copy and paste the code snippet to the functions.php of the Genesis child theme.
In case you are a little hesitant to apply PHP snippets, you can choose to customize Genesis child themes with the Genesis Extender plugin. This plugin offers a graphical interface to code changes like adding widget areas.
When you prefer to create your own child theme from scratch, you can either code a child theme manually, or compose one with the aid of the Dynamik Website Builder – like the Genesis child theme deployed here on Wilwebs.
In this Genesis Framework Review, we are going to examine Genesis by dissecting the free Sample theme. You should never activate the Genesis Framework directly, but always through a child theme. The Sample theme comes free with the Genesis Framework.
We are going look at the default menu options, how you can swap menus, describe the default widgets, check out the widget areas, and discuss the configuration options through the theme settings.
Menus
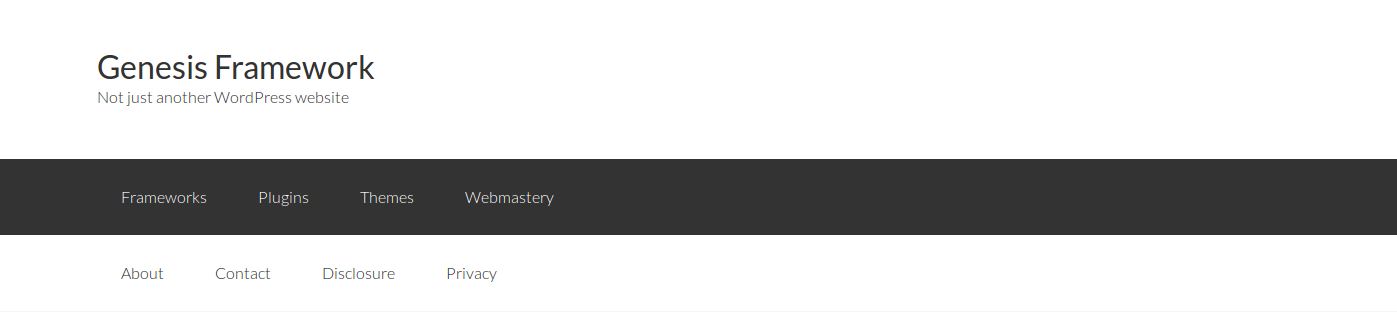
The Sample theme supports two WordPress menus.
The Primary Navigation Menu is located directly below the header, while the Secondary Navigation Menu is positioned under the former menu.
The image above displays these default menu locations.

Another popular option, is adding a custom menu to the Header Right widget area. When you check the demo, you will see that StudioPress has activated the primary menu and a custom menu in the header. The secondary menu is remains hidden.
Suppose you would like to display two menus as in this demo. But that in addition, you would like to reposition the secondary menu to the footer, just above the credits. What does it take with Genesis to achieve that?
Simply add the following code at the bottom of the functions.php of your Genesis child theme:
// Reposition the secondary navigation menu to the footer
remove_action( 'genesis_after_header', 'genesis_do_subnav' );
add_action( 'genesis_before_footer', 'genesis_do_subnav' );
What does this code do? The firsts line is a comment, for us humans.
The second line removes the menu from its default position below the header.
And the third line adds the secondary menu under the footer widgets, but before the credits.
And this is how it looks on the website:

That is really all that is takes, and a perfect demonstration of the power of the Genesis Framework.
Widgets
By default, child themes of the Genesis Framework install with three custom widgets:
- Featured Page
- Featured Posts
- User Profile
The reason that I state ‘By default’, is because theme authors have the ability to remove these default widgets.
Although, I yet have to see a Genesis theme that did not include these three widgets. The contrary is much more common, that theme authors extend their themes with additional widgets.
Thanks to the Featured Page and Featured Posts widgets it is very easy to populate the home page of business websites and online magazines – all you need are widget areas.
Additional widgets are also available as Genesis optimized plugins from StudioPress as well as from the WordPress Plugin Directory. Both resources offer these plugins for free.
And of course, installing regular WordPress – non-Genesis – plugins is also possible.
Let us have a closer look at the three default widgets of the Genesis Framework.
Featured Page widget

The Featured Page widget allows you to display the content of a page through a widget area. You select the desired page from the drop-down menu.
In the example above, a contact form is displayed inviting visitors to ask for a free quote.
When you limit the content of the page, you can add a customized Read More text in the last field.
Featured Post widget

The Featured Post widget offers a lot more options than the Featured Page widget.
You can select a category, reverse the sort order, customize the post info, include the Featured Image of the post, pick the desired dimensions, and add the gravatar of the author.
With the unordered list settings, you are able to attach a list of other themes from the same category – as a kind of related posts.
User Profile widget

The User Profile widget is very convenient for shaping ‘About me’ entries in sidebars or footer widgets. You can either use the author’s Biographical Info from the WordPress User Profile, or create a Custom Text.
You can even link to a page with a more extensive About me info, in which case the Read More text is displayed.
The Show Author Archive Link lets your visitors list all posts from the author concerned.
Widget Areas

By default, the Genesis Framework activates with six widget areas:
- Header Right
- Primary Sidebar
- Secondary Sidebar
- three Footer columns
Just as with widgets, theme authors can decide to remove default widget areas or register additional widget areas.
And of course, you have the ability to remove or add widget areas too.
Genesis Panel
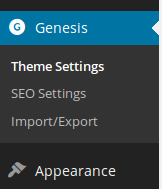 The Genesis Framework adds a module to the WordPress Admin Menu for the Genesis Panel.
This panel comprises three pages:
- Theme Settings
- SEO Settings
- Import/Export
Upon activation of a Genesis plugin, the settings page of that plugin will added to this Genesis Panel. Like the Genesis Responsive Slider for example.
SEO Settings
When you do not see the Genesis SEO page, you have most likely activated a plugin like WordPress SEO by Yoast or the All in One SEO Pack to handle your Search Engine Optimization.
The Genesis SEO Settings allow you to tweak the default SEO options concerning the Document Title, Homepage Settings, Document Head Settings, Robots Meta Settings, and Archive Settings. You can even enter your Google+ profile on the SEO page.
Furthermore, every post, page and term has its own meta box regarding SEO Settings.

Import/Export
The Import/Export page lets you create a file in JSON format for backup and transfer purposes. You can export the Theme Settings and/or the SEO Settings. And of course, you can also import (upload) the JSON file at the receiving end.
Theme Settings
The Theme Settings page serves dialogue boxes to help you configure your Genesis child theme. Here below, we will discuss the options of the Genesis Sample Theme. Other child theme might remove or add dialogue boxes.
The default Theme Settings of the Genesis Framework include the following departments:
- Information
- Custom Feeds
- Default Layout
- Header
- Navigation
- Breadcrumbs
- Comments and Trackbacks
- Content Archives
- Blog Page Template
- Header and Footer Scripts

The Information box displays the version number and release date of your current Genesis Framework.
It is recommended to enable automatic updates.
Additionally, you can choose to be notified by e-mail as soon as an update becomes available.

When you use Google Feedburner, you can enter your custom feed URLs for posts and comments here at Custom Feeds.
The default WordPress feed of Wilwebs is https://wilwebs.com/feed/, and the Feedburner version is http://feeds.feedburner.com/wilwebs.
With the Redirect Feed option you decide whether someone who enters the default feed URL https://wilwebs.com/feed/ is redirected to Feedburner, or that the default feed is displayed.

The Default Layout can be set to one column (just the content area), two columns or even three columns.
In case of a two column layouts you can choose between a left and a right sidebar.
The three column layouts offer a choice between a sidebar at each side of the content area, two sidebars at either the left or the right side of the content.
For each individual post and page, you have the ability to select another page layout than the default one set here.

With the drop-down menu at the Header box you determine whether you prefer to display Dynamic text of an image logo.
Dynamic text refers to the fact that when you alter the Site Title within the General Settings of WordPress, this updated title will be displayed.
Other Genesis child themes let you upload a logo through the Header settings of the Appearance panel or the WordPress Customizer.

Before you can configure the Navigation options, you need to create at least one WordPress menu at Appearance >> Menus.
The Navigation settings allow you to add an extra to the Primary Navigation Menu. This extra is displayed at the right side of the navigation menu.
You can choose from None, Today’s Date, RSS Feed Links, Search form and the Twitter Link. In the latter case, you are asked to enter the Twitter ID and desired Twitter link text.

When you prefer to display Breadcrumbs beneath the primary menu, you can check here on which pages these crumbs will be visible.

The check boxes at the Comments and Trackbacks give you an easy way to customize the visibility of comments and/or trackbacks at the bottom of single pages and posts.
You enter here the default settings for the website. You can alter these settings for individual pages and posts.

At the Content Archives you can set your preferences regarding the blog page listings. You can choose to display post excerpts or the post content.
When have applied a Read More tag in your posts, then the option post content will only display the content until that tag.
Another way limiting the post content is entering the maximum number of characters of that you want to display of posts.
Please note that when you limit the post content, or opt for the post excerpt, the text of your post will be stripped from all formatting – links for example, will be displayed as plain text.
When you prefer to display the post content, do not limit the number of characters and have included a Read More text, the text until the Read More link will be displayed formatted; links are clickable and text can be bold, italic, colored, whatever.
And when you choose to display the post content without limitation or Read More tag, the theme will display the entire post.
Featured Images are hidden by default on archive pages. Enabling the Featured Image on index pages is as easy as checking the box in front of “Include the Featured Image?”.
Additionally, you can select the desired dimensions and alignment for the Featured Images on archive pages.
When you include an image at the top of your posts, and opted to display the full post content or the post content until the Read More tag, you might consider disabling the Feature Image here.
Last but not least, you can set your preferred Page Navigation within the Content Archives box. You are offered two choices: Previous/Next, and Numeric.

Your choices at the Blog Page Template section determine which posts are displayed on the blog template. This selection does not affect posts on the homepage or archive pages.
The drop-down menu lets you select either “All Categories”, or just one specific blog category.
Next, you have the ability to exclude one or more categories from the blog template.
And finally, you can set the maximum number of posts to display on a blog page.
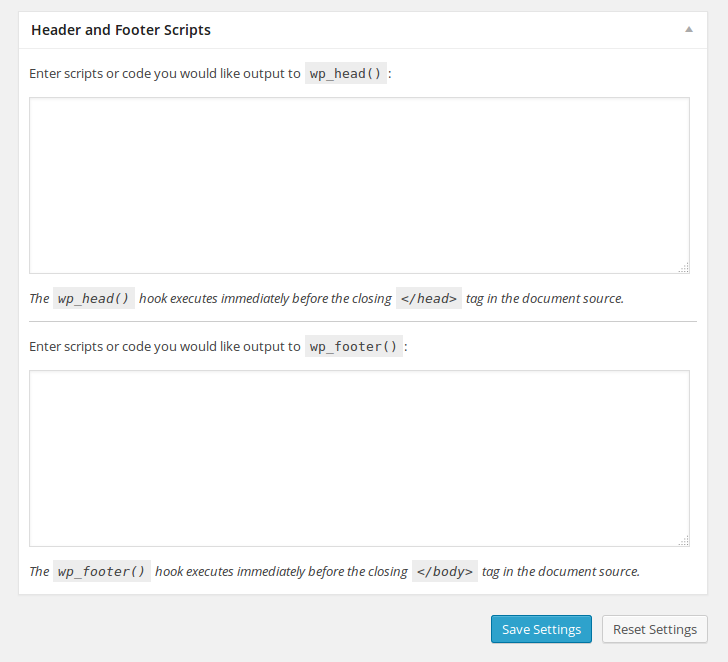
The text boxes at the Header and Footer Scripts allow you to enter your custom scripts and code for the page headers and footers, like for example Google Analytics.
Getting familiar with the Genesis Framework
I am working with Genesis for three years now, and when I need to create a website, Genesis is my first choice. Always.
And for your info, I am not a trained coder. My background is in business administration, and yet I can say that I am very comfortable working with Genesis.
StudioPress offers some interesting learning resources. For starters, check the StudioPress 101, and read the The Beginner’s Guide to the Genesis Framework (PDF).
Browse the code snippets so that you have an idea what is possible. Check out the StudioPress Tutorials and the StudioPress FAQ when necessary.
And when possible, I am always willing to help too.
The best way to get familiar with Genesis is simply start working with it. My first Genesis theme was Focus. But any HTML5 theme is a good theme to start with.
Even the Sample theme, a free HTML5 that comes with the Genesis Framework, is a good start for blogs. Purchasing a Genesis theme some time later is always an option, of course.
Or even the Pro Plus All-Theme Package, which includes the Genesis Framework, as well as all current and future child themes from StudioPress. Really.
A nice bonus is that returning customers get a 20% discount from StudioPress. And with StudioPress you get unlimited everything, including support.
The most important threshold to take, is to get your copy of Genesis and get some hands-on experience. It will give you a chance to get a taste of the power of Genesis.
If you really want to unleash this power, you need either to get your hands dirty by, for example, applying pre-cooked code snippets. It will help you to understand how Genesis works.
But I want to emphasize that you do not need to dive into the Genesis Framework to work with a Genesis child theme. Just like you do need to study the code of a WordPress theme to use one.
Just get started. I will be waiting.
Leave a Reply